PowerShell: Empty Recycle Bin

Here is a quick PowerShell script I found recently to clear the Windows Recycle Bin. This can be really useful if you want to automatically empty the Recycle Bin through something like the Task Scheduler. This code comes from the TechNet Script Center, courtesy of Windows Engineer and PowerShell Blogger Rich Prescott.

$Shell = New-Object -ComObject Shell.Application
$RecBin = $Shell.Namespace(0xA) 
$RecBin.Items() | %{Remove-Item $_.Path -Recurse -Confirm:$false}

This script allows you to view the contents of the recycle bin in your profile. The first line creates a ComObject and then the second line grabs the Recycling Bin special folder. It then enumerates the items contained in that special folder and removes each of them. The Remove-Item cmdlet includes a switch to turn off confirmation for the removal of the files. It can be removed if you would like to be prompted for each file.

Works on:

Windows Server 2012 and Up Yes Windows 10 and Up Yes
Windows Server 2008 R2 Yes Windows 8 Yes
Windows Server 2008 Yes Windows 7 Yes
Windows Server 2003 No Windows Vista Yes
Windows XP Yes
Windows 2000 No

Source

RoboForm: A full featured password manager and more

Lets face it: We have more passwords than we can ever remember. Whether it’s personal or work, we usually have dozens if not hundreds of username/password sets to remember for various applications and sites. The solution for most people is to reuse their username and passwords across sites. While this may make them easier to remember it also makes it easier for  them to be compromised. The common recommendation is to use passwords composed of alphanumeric characters (0-9, a-z, A-Z) and symbols. While that may increase the security of your passwords the likelihood of remembering one instance of “a320#.?atx!” is small, let alone 30 for a dozen different systems. It’s much easier to remember the name of a pet or a relative/spouse. So how do you get around the need for more secure passwords while  actually being able to remember the passwords themselves or instituting expensive biometric systems?  One answer is to use a password manager. There are several popular ones available but I favor RoboForm after having used it for several years. Why use a password manager and why choose RoboForm over other solutions? Well, lets dig in below and see!
Read more of this post

FizzBuzz for (almost) Every Language

FizzBuzz. Chances are that you’ll need to know it at one time or another if you apply for any programming or development job. Here are a couple ways to do FizzBuzz in a variety of languages. There are alternate ways to do this in each language but these are a few examples of some code that you could use. I”ll update this post over time as I find new examples.
Read more of this post

PowerShell: Check System Execution Policy

Here is another quick script to check your system’s Execution Policy.

batch file: pspolicycheck.bat

@echo off
powershell.exe -noexit Get-ExecutionPolicy -list

This will give you a quick list of Execution Policies on your system and give you a PowerShell prompt. Of course you can always simple run “Get-ExecutionPolicy -list” from the Command Line or PowerShell prompt. You can download bar from the above link or copy the 2 lines above to a text file and rename it .bat.

pspolicycheck-bat

Using Google Chrome to make administration a breeze

Many people use Google Chrome on their personal computers to browse. It’s likely you use it on your work PC as well if your organization allows. Google Chrome loads most sites with ease, is frequently updated and has many customization options. It’s an all around good choice. It can also make your life as an admin much easier. A browser making administration easier? What magic is this? Well, lets look at some of the options.
Read more of this post

On the Dell CS24-SC Server….


I sure anyone looking for a cheap rackmount server on eBay or many other sites has come across this server. It’s everywhere but information is hard to come by about it. Even Dell Support doesn’t know about this server. I recently purchased one with the intent on using it to upgrade my existing ESXi server (basically a Dell Studio 540 PC). I’ll be returning it but I wanted to do a quick review and list of features and resources I found in researching this.

The Dell CS24-SC are custom, 1U 2-way servers manufactured by a unknown company for clustered and cloud computing. They are full depth, about 28″ and weigh roughly 36lbs/16.3kg with 4×3.5″ drives. It has 2xGBic (1000Mbit) network ports running on the Intel® 82567 Gigabit Ethernet Controller and an additional 100Mbit management port. There are 2 USB 2.0 ports on the front and 2 USB 2.0 ports on the back along with a VGA port, Serial, and PS2 Keyboard/Mouse ports. It has a single PCI-E x8 expansion port on a riser. One major reseller is Stallard Technologies, Inc though most of the server on the market are resold through eBay. The closest PowerEdge server seems to be the Dell PowerEdge 1950 Gen III or one of the earlier PowerEdge C1100 Cloud servers.
Read more of this post

Virusscan Software for Windows Server

Anyone who has tried to install virusscan software on their server knows that the activity can quickly become more of a pain than it is worth. When trying to find virusscan software for Windows Server you typically run into one of three issues:

  1.  There’s no support for Windows Server at all.
  2.  The Windows Server version commands a massive price compared to a home/personal version, sometimes as much as a 2000% markup.
  3. The Windows version somehow manages to lack features that even the most basic of desktop version have.

So what do you do? Read more of this post

Manually upgrading ESXi 5.0 to ESXi 5.1

I finally got around to updating my ESXi server today. Since I don’t have the hardware to run vCenter and thus do not use it I had to do it the manual way. This method involves connecting via SSH but is relatively straightforward.

  1. Download the update from VMware. The following link should take you directly to your My VMware page: VMware
    1. The file should be named VMware-ESXi-<version>-depot.zip
  2. Suspend or shutdown any running VM’s and put the system into Maintainence mode.
  3. The next step is to enable SSH on your ESXi Server by going to Configuration > Security Profile > Properties. Start the SSH service and close the popup.
  4. From there you’ll want to upload the VMware-ESXi-<version>-depot.zip we downloading earlier to the server
  5. Once the zip has been uploaded, open Putty or your preferred SSH client and connect to the ESXi server.
  6. Log into the server from SSH and run the following command where <datastore> is the location of the zip we uploaded earlier and <version> is the version number of the file (in this case, ESXi-5.1.0-799733).
    1. esxcli software profile update -d /vmfs/volumes/<datastore>/VMware-ESXi-<version>-depot.zip -p ESXi-<version>-standard
  7. Once the process is finished reboot the sever. If the update was successful take the server our of Maintainence mode, and resume your VM’s.

You’ll probably have to update VMware Tools for your VM’s but your server should now be running properly on 5.1 ( or whatever version you upgraded to, assuming the command isn’t changed/removed).

VMware Reference and shortcuts

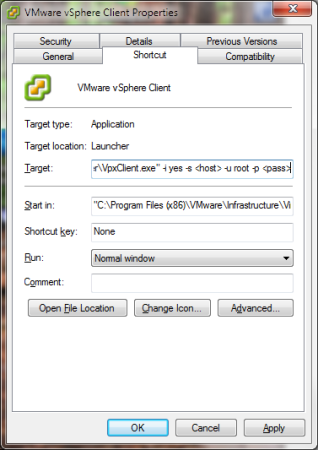
Auto-login vShpere Client shortcutvsphereshortcut

  • VpxClient.exe -i yes -s host -u user -p password
    • Auto-logins to the vSphere client with the specified host, username and password.

Convert disk from Thick to Thin Provisioning:

  • vmkfstools -i thick-disk-file thin-disk-file -d ‘thin’ -a lsilogic

Syslog

  1. http://kb.vmware.com/selfservice/microsites/search.do?language=en_US&cmd=displayKC&externalId=2003127
  • /usr/lib/vmware/vmsyslog/bin/vmsyslogd
    • to start syslog service
  • esxcli system syslog reload
    • to reload syslog service

Convert a existing Virtual Disk on ESXi from Thick Provisioning to Thin Provisioning and vice versa

I was playing around on my ESXi server and noticed most of my servers were using under 10GB yet most where consuming between 20-45GB of datastore space. This is because when I set them up I went with the default setting of Thick Provisioning like many. So what do you do? I don’t want to reinstall my servers and loose everything. I also don’t want to waste space when I can afford new disks being unemployed at the moment.  After searching around I came across 2 nice articles on using vmkfstools to “convert” (it actually is cloning the disks) to Thin Provision and vice versa.
Read more of this post

Verified by MonsterInsights