Windows/Office Digital River Links Updates [11/23/14]

I’ve  made some updates to the Windows/Office Digital River Links page to correct some broken links. Microsoft is currently in the process of migrating from their old Digital River servers to Azure. Due to that change many of the links are being changed in addition to some products being phased out. I’ll try to keep up with the changes but if I miss something just let me know. I will also be looking into a cleaner download interface so you’re not assaulted with a page full of links. The goal is a dropdown interface where you can just select your product and language and get your links. Going forward, this post will serve as the page for updates and contact for the Microsoft links.

Now as for the links themselves, I’ve made a few changes to how they are presented. For the most part they will remain the same but with the addition of alternative version and download links. For most people you can just download the latest version link but I’ll keep old versions linked for those who need them. Since this page is the second most popular page on the site I’m going to give it a little more attention and spruce it up.

Finally, a thanks to heidoc.net who figured out the change to the link structure and serve as the base source for links.

Windows/Office Digital River Links

Todo [11/23/14]:

  • Fix Broken links – Ongoing
  • Add additional alternative links
  • Clean up link presentation

PowerShell: Empty Recycle Bin

Here is a quick PowerShell script I found recently to clear the Windows Recycle Bin. This can be really useful if you want to automatically empty the Recycle Bin through something like the Task Scheduler. This code comes from the TechNet Script Center, courtesy of Windows Engineer and PowerShell Blogger Rich Prescott.

$Shell = New-Object -ComObject Shell.Application
$RecBin = $Shell.Namespace(0xA) 
$RecBin.Items() | %{Remove-Item $_.Path -Recurse -Confirm:$false}

This script allows you to view the contents of the recycle bin in your profile. The first line creates a ComObject and then the second line grabs the Recycling Bin special folder. It then enumerates the items contained in that special folder and removes each of them. The Remove-Item cmdlet includes a switch to turn off confirmation for the removal of the files. It can be removed if you would like to be prompted for each file.

Works on:

Windows Server 2012 and Up Yes Windows 10 and Up Yes
Windows Server 2008 R2 Yes Windows 8 Yes
Windows Server 2008 Yes Windows 7 Yes
Windows Server 2003 No Windows Vista Yes
Windows XP Yes
Windows 2000 No

Source

PowerShell: Check System Execution Policy

Here is another quick script to check your system’s Execution Policy.

batch file: pspolicycheck.bat

@echo off
powershell.exe -noexit Get-ExecutionPolicy -list

This will give you a quick list of Execution Policies on your system and give you a PowerShell prompt. Of course you can always simple run “Get-ExecutionPolicy -list” from the Command Line or PowerShell prompt. You can download bar from the above link or copy the 2 lines above to a text file and rename it .bat.

pspolicycheck-bat

Manually upgrading ESXi 5.0 to ESXi 5.1

I finally got around to updating my ESXi server today. Since I don’t have the hardware to run vCenter and thus do not use it I had to do it the manual way. This method involves connecting via SSH but is relatively straightforward.

  1. Download the update from VMware. The following link should take you directly to your My VMware page: VMware
    1. The file should be named VMware-ESXi-<version>-depot.zip
  2. Suspend or shutdown any running VM’s and put the system into Maintainence mode.
  3. The next step is to enable SSH on your ESXi Server by going to Configuration > Security Profile > Properties. Start the SSH service and close the popup.
  4. From there you’ll want to upload the VMware-ESXi-<version>-depot.zip we downloading earlier to the server
  5. Once the zip has been uploaded, open Putty or your preferred SSH client and connect to the ESXi server.
  6. Log into the server from SSH and run the following command where <datastore> is the location of the zip we uploaded earlier and <version> is the version number of the file (in this case, ESXi-5.1.0-799733).
    1. esxcli software profile update -d /vmfs/volumes/<datastore>/VMware-ESXi-<version>-depot.zip -p ESXi-<version>-standard
  7. Once the process is finished reboot the sever. If the update was successful take the server our of Maintainence mode, and resume your VM’s.

You’ll probably have to update VMware Tools for your VM’s but your server should now be running properly on 5.1 ( or whatever version you upgraded to, assuming the command isn’t changed/removed).

VMware Reference and shortcuts

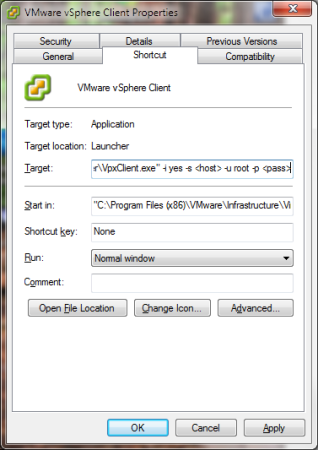
Auto-login vShpere Client shortcutvsphereshortcut

  • VpxClient.exe -i yes -s host -u user -p password
    • Auto-logins to the vSphere client with the specified host, username and password.

Convert disk from Thick to Thin Provisioning:

  • vmkfstools -i thick-disk-file thin-disk-file -d ‘thin’ -a lsilogic

Syslog

  1. http://kb.vmware.com/selfservice/microsites/search.do?language=en_US&cmd=displayKC&externalId=2003127
  • /usr/lib/vmware/vmsyslog/bin/vmsyslogd
    • to start syslog service
  • esxcli system syslog reload
    • to reload syslog service

Convert a existing Virtual Disk on ESXi from Thick Provisioning to Thin Provisioning and vice versa

I was playing around on my ESXi server and noticed most of my servers were using under 10GB yet most where consuming between 20-45GB of datastore space. This is because when I set them up I went with the default setting of Thick Provisioning like many. So what do you do? I don’t want to reinstall my servers and loose everything. I also don’t want to waste space when I can afford new disks being unemployed at the moment.  After searching around I came across 2 nice articles on using vmkfstools to “convert” (it actually is cloning the disks) to Thin Provision and vice versa.
Read more of this post

Verified by MonsterInsights